For the complete documentation index, see llms.txt. This page is also available as Markdown.

How to Connect Shopify

Steps

1. Log in to Hypercape BIZ

Log in to Hypercape BIZ
Log in to your Hypercape BIZ account at biz.hypercape.com. Enter your email address and password, then click "Sign in". You can also sign in with your Google account.

2. Navigate to Setup

Navigate to Setup
After logging in, navigate to the left sidebar and click on "Setup".
3. Setup Page

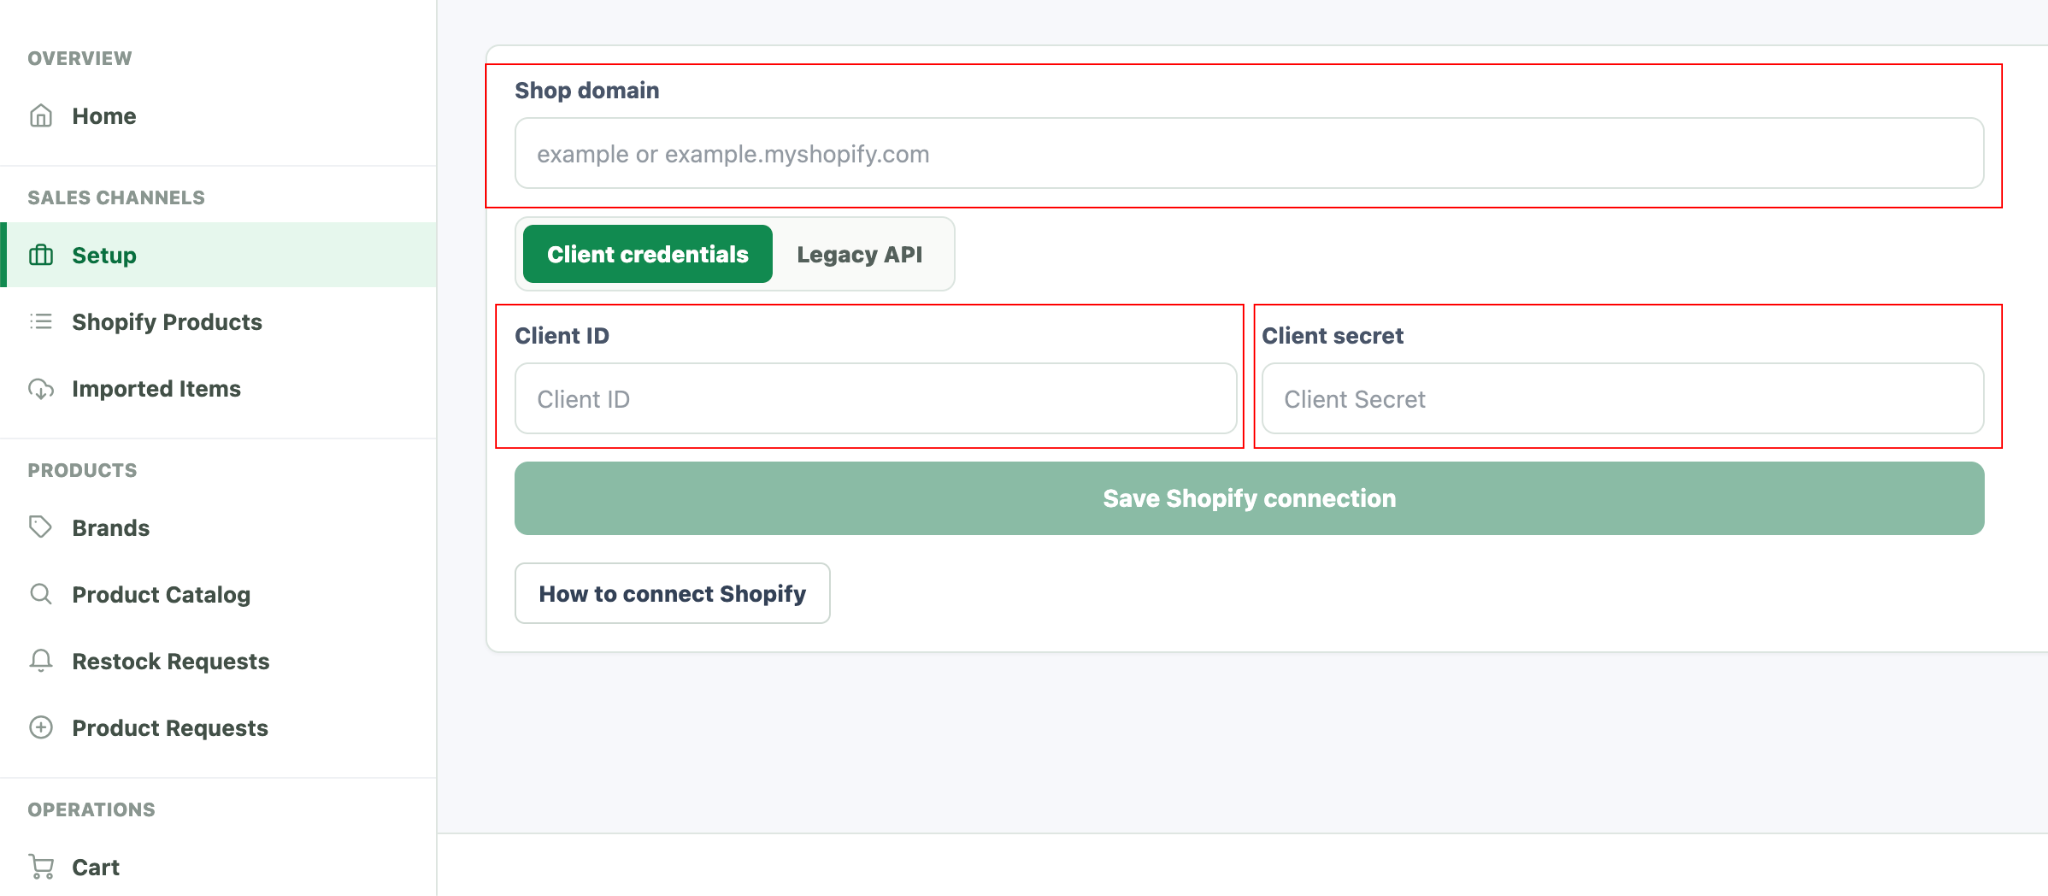
Hypercape BIZ Setup page
On the Setup page, you'll need your Shop domain along with your Shopify store's Client ID and Client Secret to connect your Shopify account. To find this information, go to your Shopify admin page.

4. Open Shopify Admin Site

Open Shopify Admin
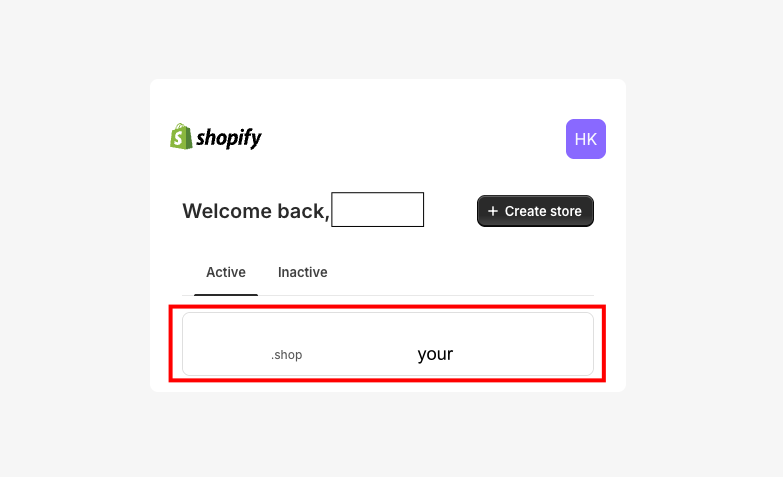
Go to your Shopify admin site at admin.shopify.com.
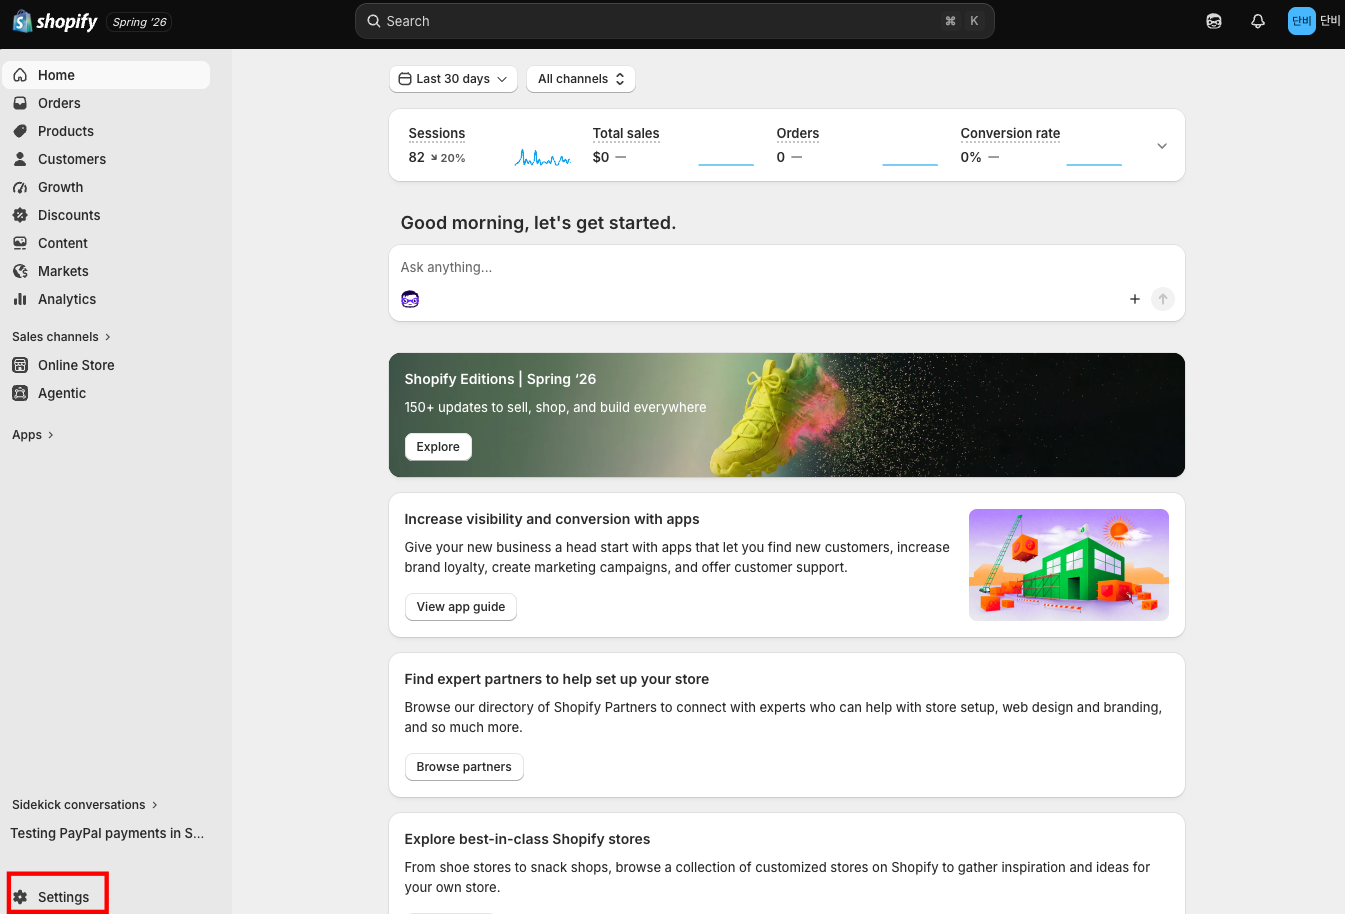
5. Access Dev Dashboard

Go to your Shopify admin site and follow these steps:

  1. Click Settings at the bottom left.

  2. In the left-hand menu, click Apps.

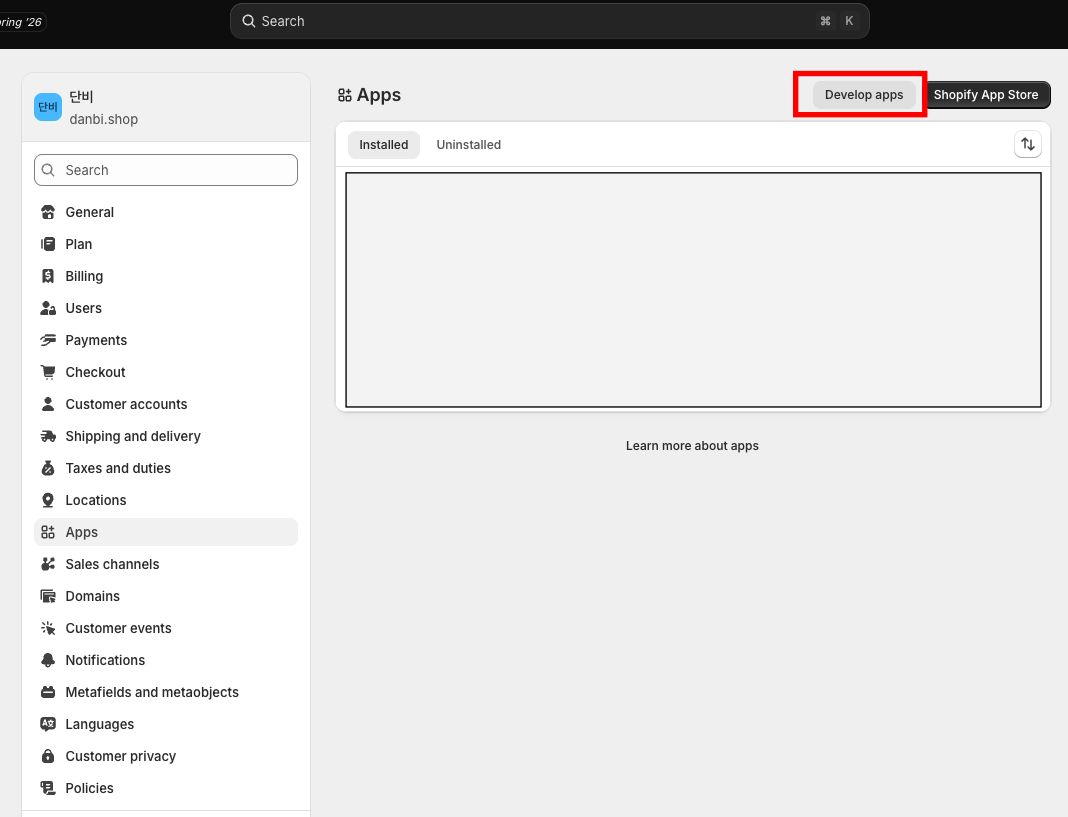
  3. On the Apps page, click Develop apps in the top right.

  4. Click Build apps in Dev Dashboard.

Open Shopify Settings
Click "Settings" at the bottom left of Shopify Admin.
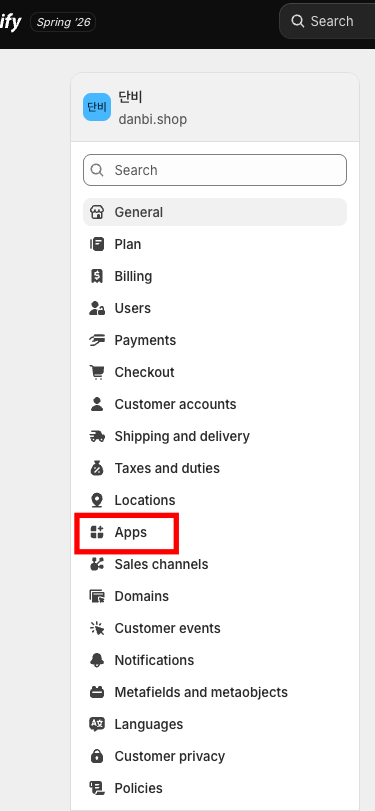
Open Apps menu
Open "Apps" from the Settings menu.
Open Develop apps
Click "Develop apps" in the top right.
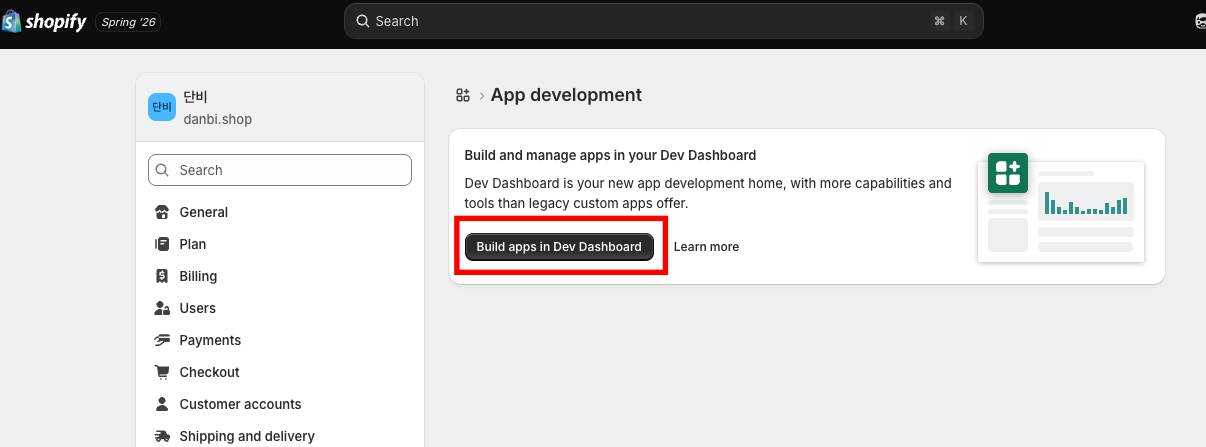
Build apps in Dev Dashboard
Click "Build apps in Dev Dashboard".

6. Click Create App

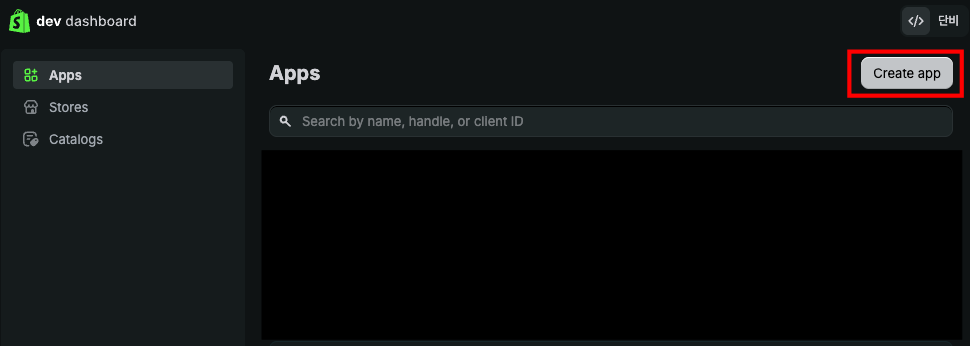
Click Create app
On the Dev Dashboard page, click "Create app" in the top right corner.
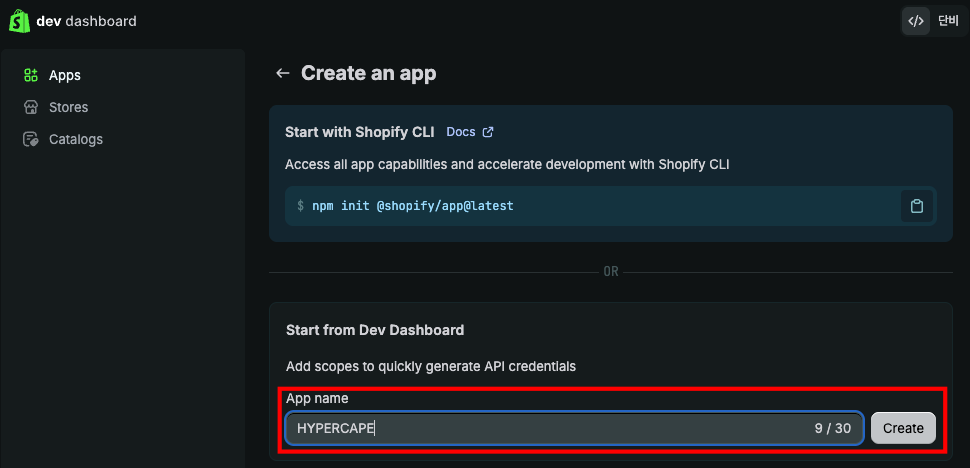
7. Enter App Name

Enter app name
Enter your desired app name (e.g., "hypercape") and click the "Create" button.
8. Configure API Scopes

Configure API scopes
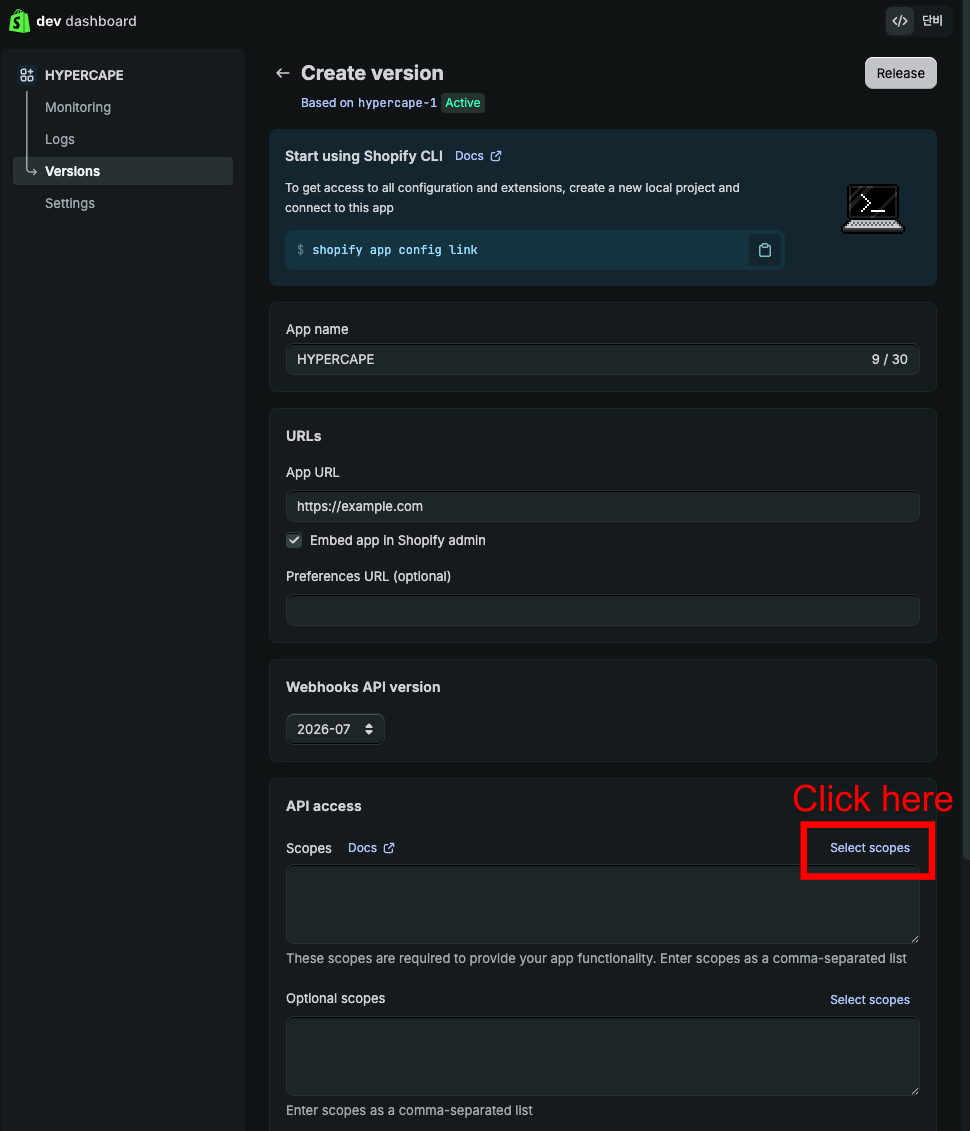
After your app is created, you'll be taken to the app configuration page. Scroll down to the "Access" section and click "Select scopes" to configure the API permissions.

These scopes define exactly which parts of your store Hypercape can access โ€” Hypercape can never access anything outside the scopes you approve here.

9. Select Required Scopes

In the "Select scopes" modal, search and enable the following Admin API scopes:

  • Products: read_products, write_products

  • Order editing: read_order_edits, write_order_edits

  • Orders: read_orders, write_orders

  • Fulfillment services: read_fulfillments, write_fulfillments

  • Merchant managed fulfillment: read_merchant_managed_fulfillment_orders, write_merchant_managed_fulfillment_orders

  • Third party fulfillment: read_third_party_fulfillment_orders, write_third_party_fulfillment_orders

  • Custom fulfillment services: read_custom_fulfillment_services, write_custom_fulfillment_services

  • Assigned fulfillment: read_assigned_fulfillment_orders, write_assigned_fulfillment_orders

Click "Done" after selecting all scopes.

Select Products Scope
Select the Products scope: read_products, write_products.
Select Order Editing Scope
Select the Order editing scope: read_order_edits, write_order_edits.
Select Orders Scope
Select the Orders scope: read_orders, write_orders.
Select Fulfillment Scopes
Select fulfillment-related scopes as shown in the modal.
Select Custom Fulfillment Services Scope
Select the Custom fulfillment services scope: read_custom_fulfillment_services, write_custom_fulfillment_services.
Select Assigned Fulfillment Scope
Select the Assigned fulfillment scope: read_assigned_fulfillment_orders, write_assigned_fulfillment_orders.
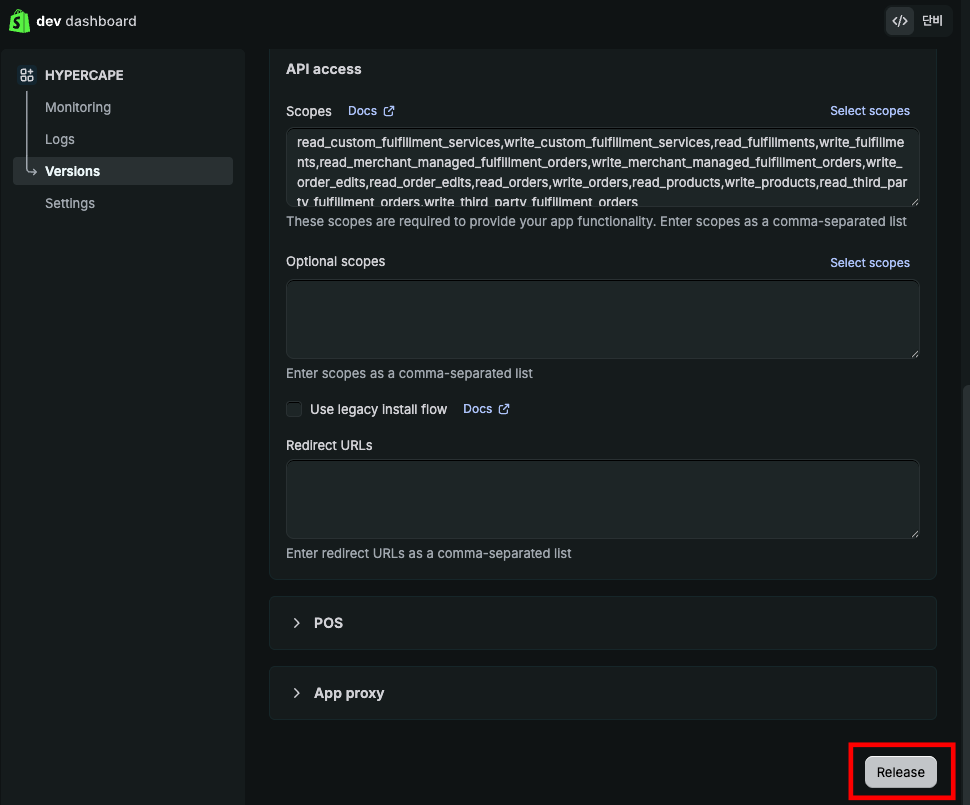
For Existing Users: How to Update Permissions

10. Release Your App

After configuring your scopes, scroll down to the bottom of the page and click the "Release" button to publish your app version with the selected permissions.

Release the app
Click "Release" after configuring the required API scopes.
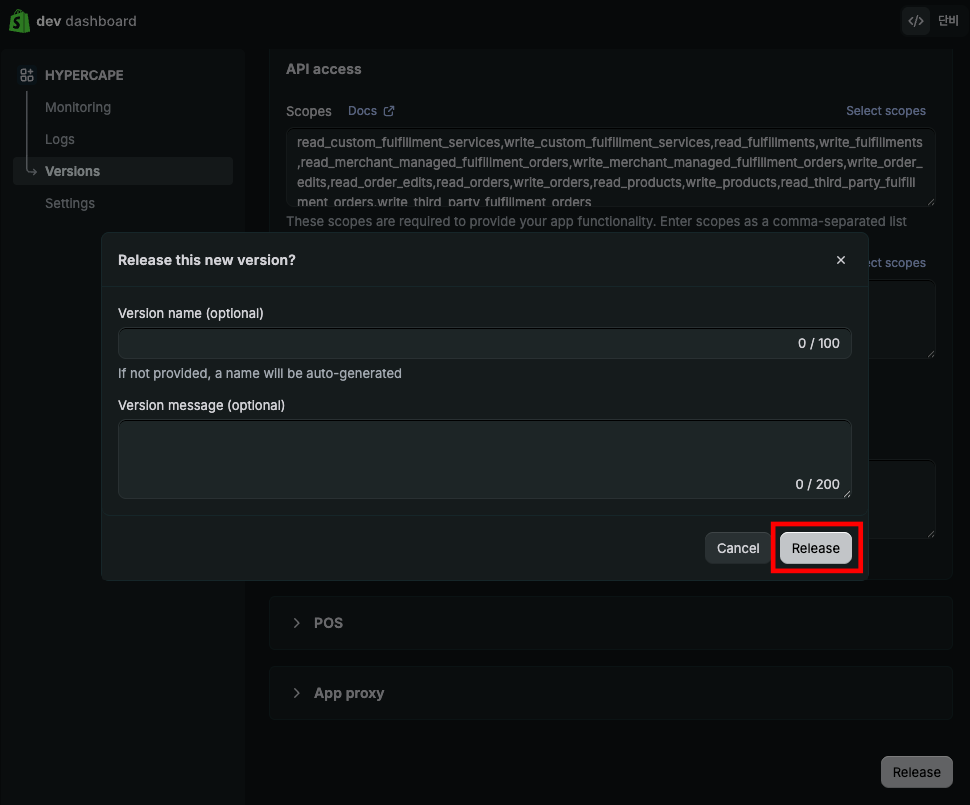
Release app version
Confirm the release to publish the app version with the selected permissions.
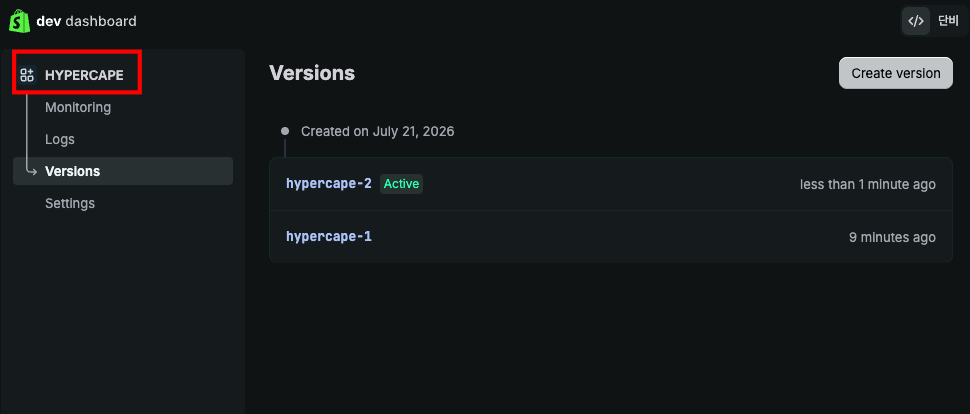
11. Install App to Your Store

After releasing your app, install it on your Shopify store. In the "Overview" section, click the "Install app" button. A confirmation dialog will show the permissions your app needs; click "Install" to complete the installation.

Open the active app version
Open the active version of your released app.
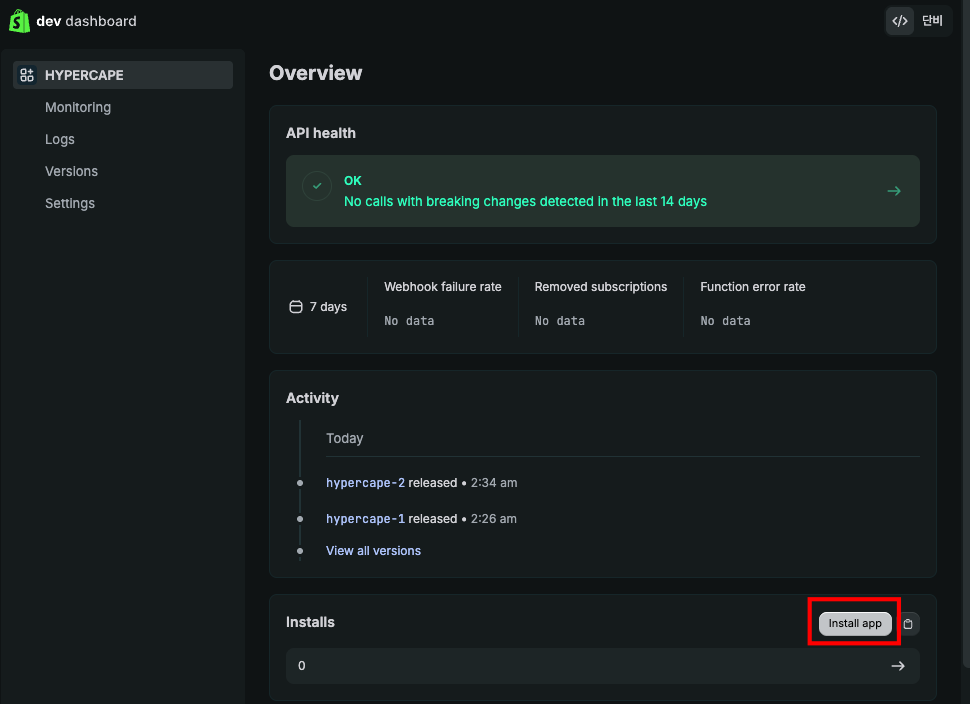
Click Install app
Click the "Install app" button.
Select a Shopify store
Select the Shopify store where you want to install the app.
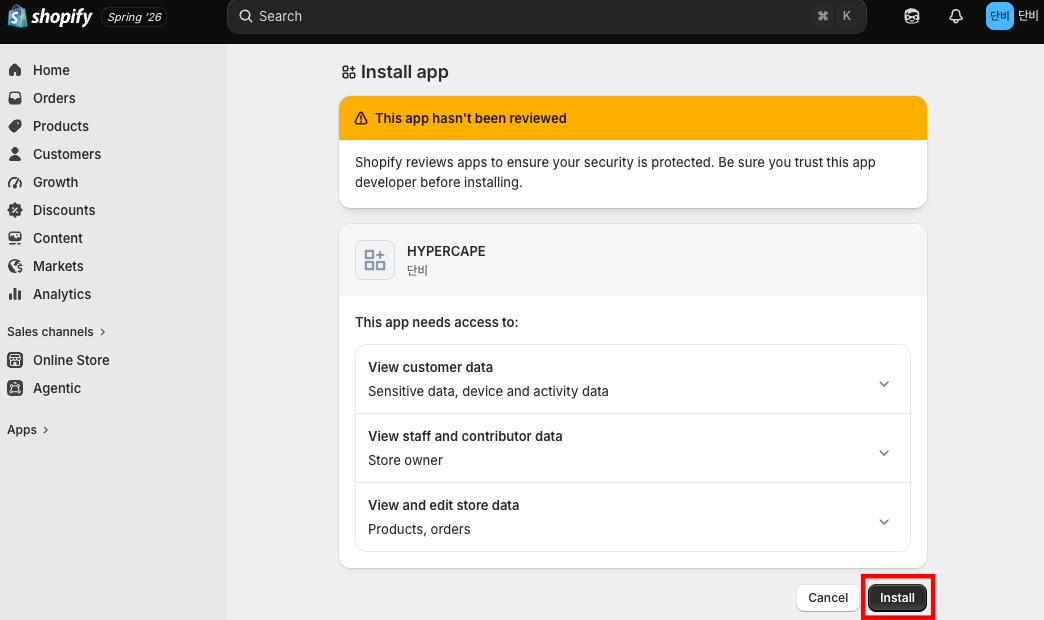
Confirm app installation
Review the requested permissions and click "Install".
Installing the app only grants Hypercape the permissions you configured. This does not complete the connection yet โ€” you will finish connecting on the Hypercape BIZ Setup page in Step 14. You do not need to open or use the app itself.

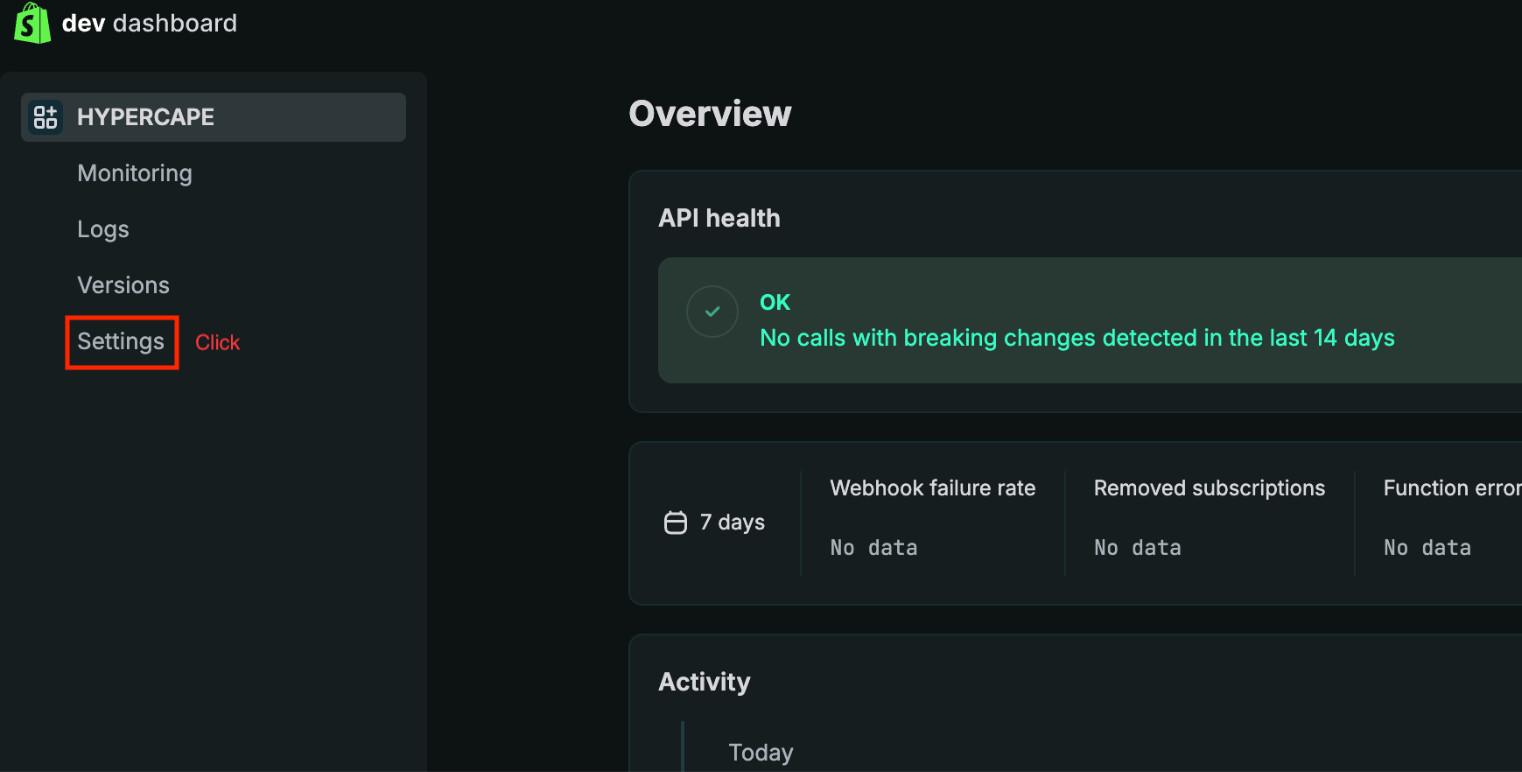
12. Go to Settings

Go to app Settings
Navigate to the "Settings" tab in the left sidebar.

13. Copy Your Credentials

Copy Client ID and Client Secret
In the Settings page, you'll find the "Credentials" section containing your Client ID and Client Secret. Click the copy icon next to each field to copy these values.

These two values are what actually connect your store to Hypercape โ€” the app itself is not used after this point.

14. Enter Your Credentials

Enter Shopify credentials in Hypercape BIZ
Return to the Hypercape BIZ "Setup" page. Paste your copied Client ID and Client Secret into the corresponding fields. Enter your Shopify store URL (the part before .myshopify.com). Click "Save Shopify connection" to complete the connection.

15. Connection Complete!

Shopify connection complete
If you see the screen below with your store name listed, congratulations! Your Shopify store has been successfully connected to Hypercape. You can now start importing and managing products.

Need help?

If you encounter any issues during the setup process, contact us at help@hypercape.com.